PPPoE
Create IP Pool (IP -> Pool)

Most probably you already had IP Pools in your Mikrotik, if you don't have Pools then create IP Pools for PPPoE Profile. When a user will connect to the network he will get IP from these Pools.Most probably you already had IP Pools in your Mikrotik, if you don't have Pools then create IP Pools for PPPoE Profile. When a user will connect to the network he will get IP from these Pools.
| Number | Attribute | Description |
|---|---|---|
| 1 | Name | Enter the IP Pool Name. |
| 2 | Addresses | Enter the IP Pool Addresses. |
| 3 | Next Pool | Select on the Next Pool. |
Create PPPoE Profile (PPPoE -> PPPoE Profile)

You need to create a PPPoE Profile for each and individual interface so that you can manage your users more effectively. In each interface, you need to select the respective PPPoE Profile, and in PPPoE Profile must set Local Address as interface gateway and Remote Address as Pool. Zal Pro will override this Remote Address if you set Pool name in the Zal Pro package.
| Number | Attribute | Description |
|---|---|---|
| 1 | Name | Enter the PPP profile Name. |
| 2 | Local Address | Enter the PPP profile Local Address. |
| 3 | Remote Address | Enter the PPP profile Remote Address. |
Create PPPoE Server (PPPoE -> PPPoE Server)
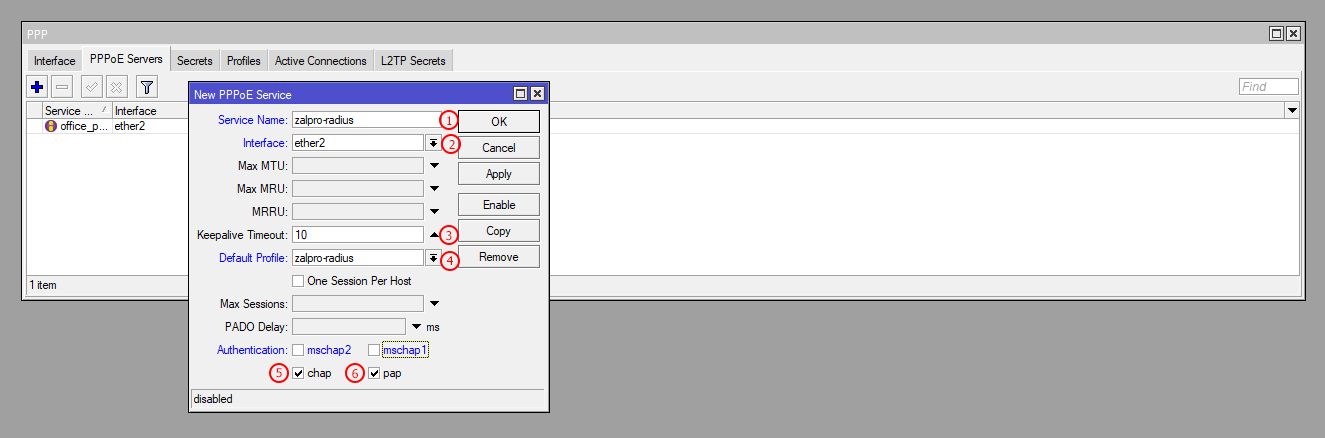
You need to create a PPPoE Server for each interface or for those interfaces which will be used for PPPoE user connection. You must select the correct PPPoE Profile from the dropdown. Each PPPoE Server should have a different PPPoE Profile. Make sure you select only CHAP and PAP authentication.
| Number | Attribute | Description |
|---|---|---|
| 1 | Service Name | Click on the PPPoE Servers (+)Plus button. Then enter the name of the service. |
| 2 | Interface | Select on interface. |
| 3 | Keepalive Timeout | Set on Keepalive Timeout 10. |
| 4 | Default Profile | Select on the default profile name. |
| 5 | Chap | Select CHAP. |
| 6 | Pap | Select PAP. |
Config PPPoE For Radius AAA
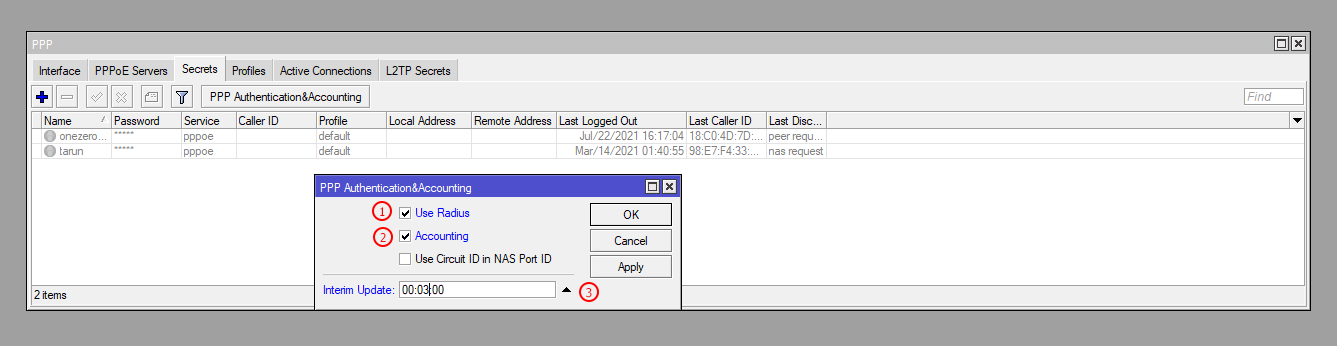
The most important part is enabling your PPPoE Servers for Radius and Radius Accounting (AAA). You can do that from PPPoE Authentication & Accounting section. Check Radius & Accounting options here. Don't forget to set the Accounting data sending time here which is 00:03:00 (3 Minutes). If you don't need to track data or accounting for data usage then ignore Interim Update time.
| Number | Attribute | Description |
|---|---|---|
| 1 | Use Radius | Check Radius Box. |
| 2 | Accounting | Check Accounting Box. |
| 3 | Interim Update | Set Interim Update Time Minimum 3 mins and maximum 15 mins. |