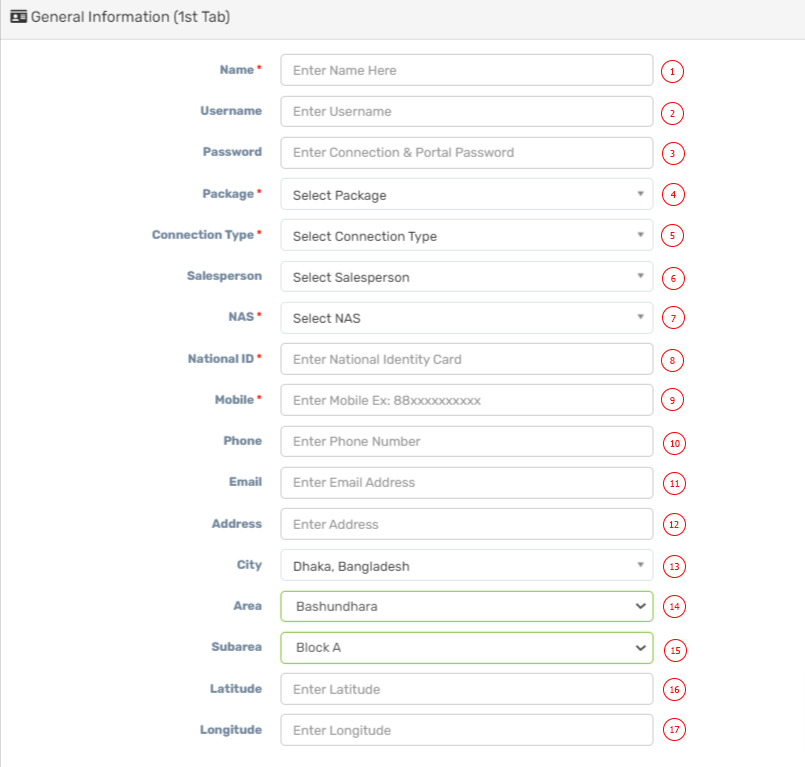
| 1 |
Name |
Insert user full name. |
| 2 |
Username |
Insert user username, username is required for panel & internet login. Avoid use of special characters in username, use only letter if possible. Zal Pro prevent login into panel for some special characters in username and its for preventing SQL injection etc. |
| 3 |
Password |
Password for connection & portal access. User will use this password for PPPoE/Hotspot/Portal. |
| 4 |
Package |
Select package from dropdown list, if none there, you need to create one in package module. |
| 5 |
Connection Type |
Select user connection type, Zal Pro has five connection types as Radius PPPoE, Radius Hotspot, API PPPoE, API Hotspot and API Static IP. You must set Accept All in settings to show connection types here. Radius connection types will create user in Zal Pro on the other hand API connection types will create user's secret and other info into your router directly by Router API. |
| 6 |
Salesperson |
Select a Salesperson. |
| 7 |
NAS |
Select a nas for user, live graph, api call etc depends on nas/router ip. All nas should be online and active in Zal Pro. |
| 8 |
National ID |
Insert user national ID number. |
| 9 |
Mobile |
Insert your mobile/phone number with country code, Zal Pro will send SMS to this number. Also, user can use this number to login into their panel. |
| 10 |
Phone |
Insert user phone number. |
| 11 |
Email |
Insert user email address, Zal Pro will send email to this email address. Also, user can use this email to login into their panel. |
| 12 |
Address |
Insert address here, you can be creative here with some special address format. Example: House: A 1/1, Road: 12, Zip: 1000. |
| 13 |
City |
Select user city, its important for graph in dashboard. You may need to create city first in area module. |
| 14 |
Area |
Select user area, its important for graph in dashboard. You may need to create area first in area module. |
| 15 |
Sub-Area |
Select user sub-area, its important for graph in dashboard. You may need to create sub-area first in area module. |
| 16 |
Latitude |
Insert your location latitude coordinates for maps in Zal Pro. Use this format Ex: 23.810331 |
| 17 |
Longitude |
Insert your location longitude coordinates for maps in Zal Pro. Use this format Ex: 90.412521 |
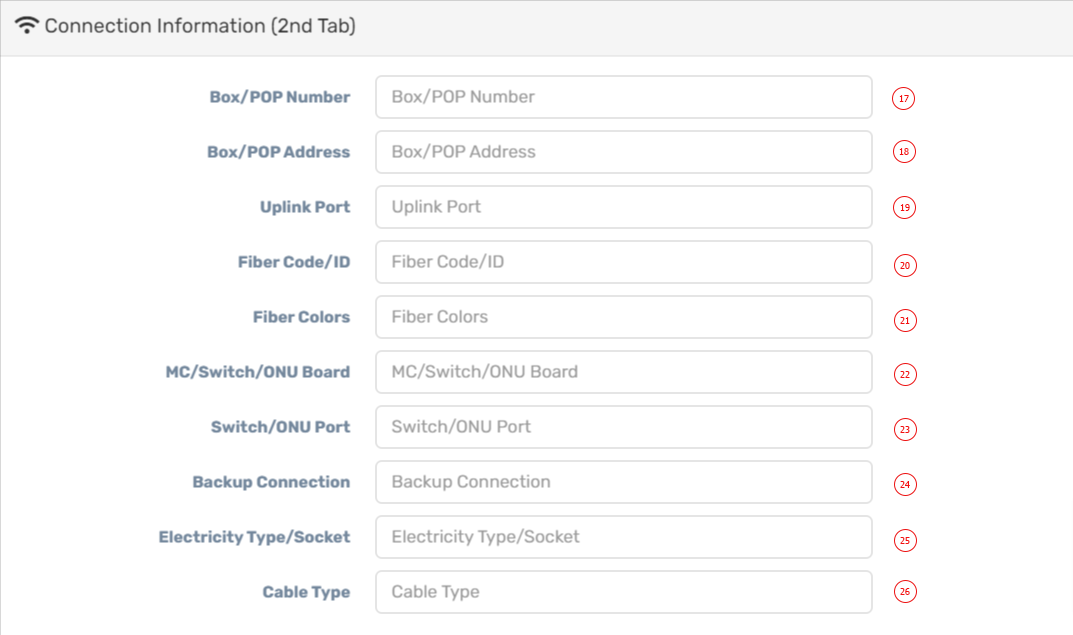
| 18 |
Box/Pop Number |
Box number, on which box user's cable connected. |
| 19 |
Box/Pop Address |
Box address, on which box user's cable connected and where is the box or tower located. |
| 20 |
Uplink Port |
Switch or Hub uplink port number. |
| 21 |
Fiber Code/ID |
Code number of fiber/main cable, on which user connected. |
| 22 |
Fiber Color |
Fiber cable color, on which user connected. |
| 23 |
MC/Switch/ONU Board |
Number/Name of switch board, on which user connected. |
| 24 |
Switch/ONU Port |
Port of switch board, on which user connected. |
| 25 |
Backup Connection |
Backup connection name or number if has any where user will be connected if necessary. |
| 26 |
Electricity Type/Socket |
User router/swithc/hub power information. |
| 27 |
Cable Type |
User cable type. |