User -> Import Users
First, download this sample csv file as example of data input, download here. Please read below table carefully to insert data into csv file properly. If you want to activate users automatically with an expire date then you need to set expire date and package properly. You must set expire date format like this : 01 Jan 2020 23:59 or 01-01-2020 23:59
Note : Lat & Long use this format : 23.810331 & 90.412521
| Number | Attribute | Description |
|---|---|---|
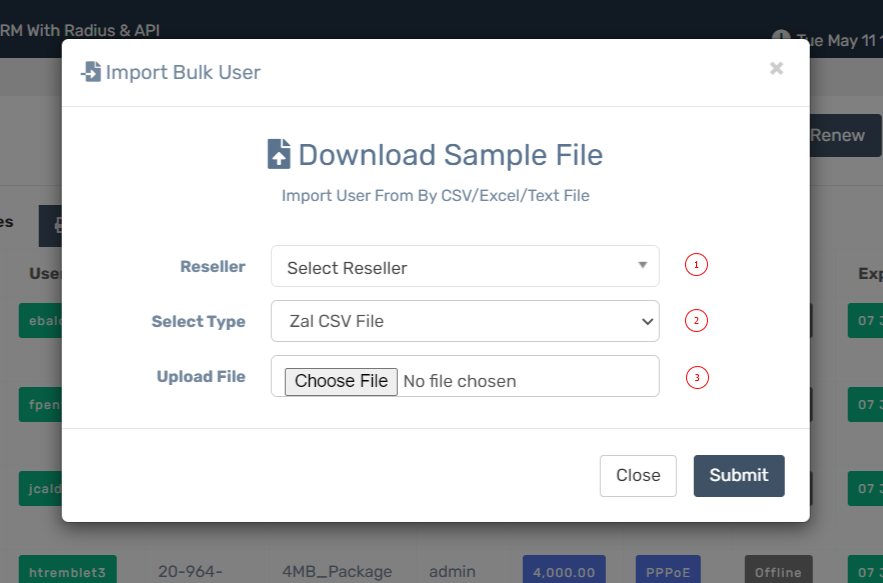
| 1 | Reseller | Select a reseller to whom you want to add imported users as their salesperson. Leave blank if you want to add imported users to admin/logged in account. |
| 2 | Select Type | Select Zal Pro dropdown. |
| 3 | Upload File | Upload Zal Pro CSV file which you filled with your users data. Keep 1000 users in each CSV file for convenience. Make sure you did not changed any column name in Zal Pro CSV file. |
Sample User Import

| Number | Attribute | Required | Description |
|---|---|---|---|
| 1 | Full Name | Yes | Full name of the user. |
| 2 | Identity Number | Yes | User national identity number. |
| 3 | Mobile Number | Yes | User moible number. This is the number where system will send SMS notification. You must insert mobile number with country code, otherwise it will failed to receive SMS. |
| 4 | User Name | Yes | Username of the user. This value must have to be unique, if username exist then user will not import as new. |
| 5 | Password | Yes | Password for connection & portal access. User will use this password for PPPoE/Hotspot/Portal. |
| 6 | Connection Type | Yes | User connection type id : 1 (Radius PPPoE), 2 (Radius Hotspot), 3 (API PPPoE), 4 (API Hotspot), 5 (API Static). |
| 7 | Expiration Date | Yes | You must set expiration date if you want to auto activate user during import. Expiration date should be this format : 01 Jan 2020 23:59. Hint: If you use Excel then check field option to set the date format. |
| 8 | Package Id | Yes | Package ID from Zal Pro package module. You must set package id to auto activate user. |
| 9 | Nas Id | Yes | NAS ID from Zal Pro network module. |
| 10 | Static Ip | No | If you want to set static ip for user then set it here. |
| 11 | Mac Address | No | If you want to set macaddress for user then set it here. User only able to login from this mac. |
| 12 | Phone Number | Yes | User phone number. |
| 13 | Email Address | Yes | User email address. |
| 14 | Address | No | User address. Try to insert short address in few words, long address will cut in half. |
| 15 | City Id | No | Insert city id not city name. Check area module for city id. |
| 16 | Area Id | No | Insert area id not area name. Check area module for area id. |
| 17 | Subarea Id | No | Insert subarea id not subarea name. Check area module for subarea id. |
| 18 | Latitude | No | Insert user latitude coordinates. This info important for Map in dashboard. Use this format Ex: 23.810331 |
| 19 | Longitude | No | Insert user longitude coordinates. This info important for Map in dashboard. Use this format Ex: 90.412521 |
| 20 | Box Number | No | Box number, on which box user's cable connected. |
| 21 | Box Address | No | Box address, on which box user's cable connected and where is the box or tower located. |
| 22 | Uplinkport | No | Switch or Hub uplink port number. |
| 23 | Fibercode | No | Code number of fiber/main cable, on which user connected. |
| 24 | Fibercolor | No | Fiber/Main cable color, on which user connected. |
| 25 | Switchboard | No | Number/Name of switch board, on which user connected. |
| 26 | Backup Connection | No | Backup connection name or number if has any where user will be connected if necessary. |
| 27 | Electricity Socket | No | How user router/swithc/hub powered. |
| 28 | Cable Type | No | User cable type. |